Table of Contents
Looter
Summary
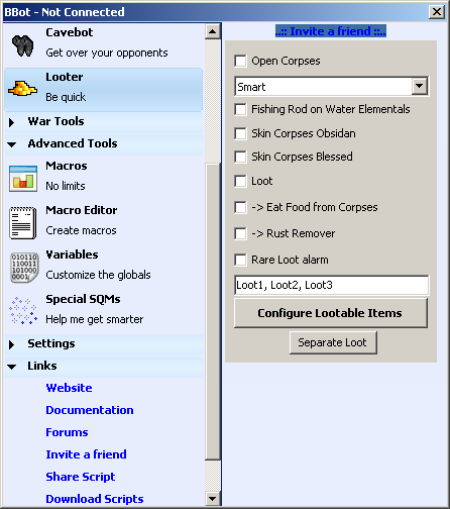
The Looter is a group of features that help on the automation of looting / opening corpses.
Settings
Open Corpses: open the corpses of the last killed target.
- Smart: after he killed the first creature, the body that opens and starts to kill the next, merging and making it faster and smarter.
- Loot Before Kill: Kill the creature and only then opens the body. Always performs the same steps. Kill > Opens the body.
- Loot After Kill: Only will open the bodies after killing all the creatures that are on your range.
Note: For the 3 above options work properly, we need the Chase Auto Off is selected from the tibia, and the Distance from the Killer has a value >=1
Fishing Rod on Water Elementals: use the fishing rod on the dead water elementals.
Skin Corpses Obsidian and Blessed: use Obsidian Knife and Blessed Wooden Stake on Vampires, Behemoths, Demons, etc.
Loot: loot item from backpacks.
→ Eat Food from Corpses: this eat food from the dead monsters.
→ Rust Remover: Will use Flask of Rust Remover in rusty armor and rusty legs.
Rare Loot alarm: start a alarm if the last killed creature drops an item wished by the player.
Separate Loot: create a loot list to organize Green/Blue Djinns and Rashid items on the backpacks.
Configure Lootable Items
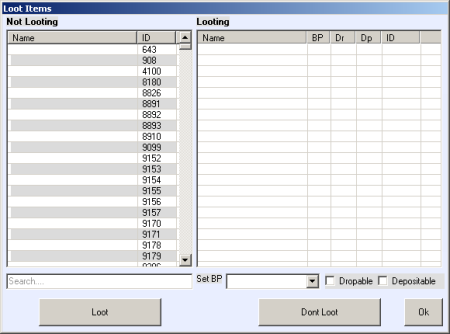
On this screen you select the items the Looter will get, also you can configure their target backpacks, including the ground as target too.
If you want to drop a determined item while not having enough cap for pick up more important items, you can check Cavebot Dropable while the item is still selected in the right box.
Search box: type the name or ID of the desired item and press <ENTER>
Loot Button: just press the Looter button to add the item in the right list.
Set BP:
- Bp 1-16…18-∞: selects the backpacks that are currently open
- 17. Ground: select this if you want to drop items on the ground
Don't Loot Button: just press the Don't Loot Button to remove the item from the right list
Dropable: used in conjunction with the command: Add Types > Drop Loot
Depositable:
- Y: item depositable in the depot
- N: item not depositable in the depot
Ok Button: click this button after finishing all the configuration.
How to Configure
- In the Not Looting box, write the name of the item.
- After found the item, just click on the Loot button.
- In the Looting box, select the item and set bp, selecting the bp in the option Set BP.
- Check or uncheck Depositable option. Great for don't let the bbot deposit their Mana Potions or Health Potions that you looted of the creatures.
- Finally, click on the OK button.

